 on [Unsplash](https://unsplash.com/s/visual/e7e2efd9-e567-4aae-a536-9f8de88fdad4?utm_source=unsplash&utm_medium=referral&utm_content=creditCopyText)](https://images.unsplash.com/photo-1557695126-fa2ce36f6828?crop=entropy&cs=tinysrgb&fit=max&fm=jpg&ixid=MXwxMTc3M3wwfDF8c2VhcmNofDJ8fHNvdW5kJTIwbWl4aW5nfGVufDB8fHw&ixlib=rb-1.2.1&q=80&w=2000)
FMOD is a great addition to any game project, but only offers official support for Unity or Unreal. If you are a Godot user, then there is a little setup work to be done to integrate with FMOD. Thankfully, there has been some great work completed by the open source community in the form of two repositories: godot-fmod-integration and fmod-gdnative. This article will cover setting up and running a basic Godot project with FMOD support using the fmod-gdnative repository.
Compiling Godot vs Using GDNative
There are two options for using FMOD with Godot. The first is to rebuild the Godot engine from source with the integration built-in as done by the godot-fmod-integration repository. This has the advantage of very little setup to run, but has the disadvantage of being difficult to update. If either the FMOD integration layer or the Godot engine need to be updated, then the entire engine needs to be recompiled. If you do wish to go this route and do not want to initially build Godot yourself, then there are binaries available in the Releases section of the repository.
The second option is to provide FMOD integration via a Godot GDNative plugin. This means that the Godot engine itself does not need to be manually compiled and the FMOD integration can be provided by a plugin that can be independently updated. The fmod-gdnative repository provides this plugin, which can be manually compiled or used via the libraries available in the Releases section of the repository.
FMOD Integration
Step 1: Create a new Godot project. You do not need to do this if you are integrating FMOD into an existing Godot project. If you need help setting up a new project, then check out my guide here.
Step 2: Create an addons folder in your Godot project root directory, if you do not already have one, by right clicking on the FileSystem pane and selecting New Folder. Ensure you name it addons.
Step 3: Create a fmod folder within the addons folder by right clicking on the addons folder and selecting New Folder. Your project structure should look like the following:
<Project root, i.e. res://>
├── addons
│   └── fmod
└── <other project files>
Step 4: Copy the fmod-gdnative files from the demo project’s fmod folder into your newly created fmod folder. These files provide the FMOD library as a singleton to your project. Your project structure should now look like the following:
<Project root, i.e. res://>
├── addons
│   └── fmod
│       ├── libs
|       |   ├── android
|       |   |   ├── arm64_v8a
|       |   |   └── armeabi_v7a
|       |   ├── iOS
|       |   ├── linux
|       |   ├── osx
│       │   └── windows
│       ├── Fmod.gd
│       ├── Fmod.gdnlib
│       ├── Fmod.gdns
│       ├── fmod_singleton.gd
│       └── plugin.cfg
└── <other project files>
Step 5: Download the appropriate fmod-gdnative libraries from the Releases section of the repository. Version 3.0.1 was used for this tutorial. Place each library in the corresponding platform folder under the libs directory. You will only need the libraries for the systems you are targeting. For instance, I am only targeting Mac OS X so I only downloaded the libGodotFmod.osx.release.64.dylib file and placed in the res://addons/fmod/libs/osx folder. If you are targeting Windows, then download the appropriate windows libraries and place in the res://addons/fmod/libs/windows folder and so forth. I also removed the other platform folders that I am not using so my directory structure looks like the following:
<Project root, i.e. res://>
├── addons
│   └── fmod
│       ├── libs
│       │   └── osx
│       │       └── libGodotFmod.osx.release.64.dylib
│       ├── Fmod.gd
│       ├── Fmod.gdnlib
│       ├── Fmod.gdns
│       ├── fmod_singleton.gd
│       └── plugin.cfg
└── <other project files>
Step 6: Download the FMOD libraries from the FMOD Downloads page. If you have not registered on the FMOD website, then you will need to register and sign in before being able to access the downloads. Once you have access to the downloads, select the FMOD Studio Suite and then version 2.00.14 of the FMOD Engine. This is the latest version that works with fmod-gdnative at the time of writing. Select the download for the appropriate platform to match what you are supporting in the previous step.
Step 7: If you do not have FMOD Studio installed, go ahead and download and install the 2.00.14 version to match the downloaded FMOD libraries. If you are not going to edit or produce any FMOD files, such as sound banks, then you can skip this step.
Step 8: Copy the FMOD libraries found in the api/core/lib and api/studio/lib folders, that were downloaded in step 6, to the appropriate folder within the Godot fmod plugin’s libs folder. For instance, for a Mac OS X setup, the following would be the final project setup:
<Project root, i.e. res://>
├── addons
│   └── fmod
│       ├── libs
│       │   └── osx
│       │       ├── libGodotFmod.osx.release.64.dylib
│       │       ├── libfmod.dylib
│       │       └── libfmodstudio.dylib
│       ├── Fmod.gd
│       ├── Fmod.gdnlib
│       ├── Fmod.gdns
│       ├── fmod_singleton.gd
│       └── plugin.cfg
└── <other project files>
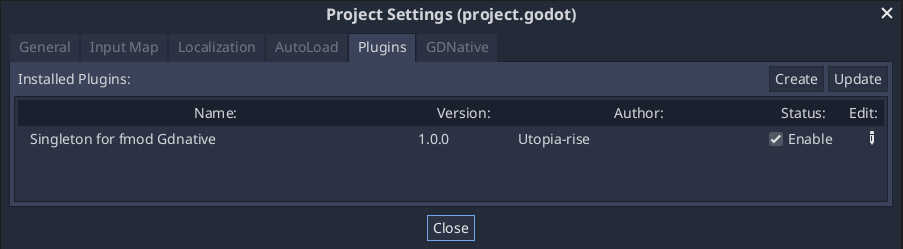
Step 9: Enable the FMOD plugin in the Godot project settings. Select the Project menu and then Project Settings. Select the Plugins tab at the top of the dialog box. You should see the plugin listed as Singleton for fmod Gdnative. If the Enable checkbox under the Status heading is not checked, then click the checkbox to enable the plugin as seen below.
At this point the FMOD interface should be integrated with your Godot project and ready to use. If everything is setup correctly, then clicking the run button with the default scene should produce the following output:
Fmod Gdnative interface managed by a GDScript wrapper
You are now ready to begin using the FMOD API in your project. All of the supported singleton commands, constants, and signals can be found in the res://addons/fmod/Fmod.gd file. Further information about each API command can be found in the FMOD documentation.